Disclaimer
This post is dedicated to Ethical Hacking and legal Penetration Testing. All information is for educational use only. Never attempt to use these techniques on or against systems that you do not own, or have express permission to do so.
Recap
In our previous post, we embarked on a deep dive into the intricate realm of Kerberos, unraveling the tapestry of its protocol flow. Armed with a comprehensive understanding, we explored the landscape of potential attacks that could be strategically waged against this crucial service. Additionally, we dissected the nuanced requirements that each attack demands, navigating the intricate web of tactics and techniques.
Recon Phase
During this phase, our objective is to pinpoint systems and potential initial pathways to access devices within the network. We will explore various tools that can facilitate the gathering of crucial information to aid our process.
NMap
To begin our exploration of Kerberos attacks, we first need to understand the network’s landscape. We’ll use nmap, a popular tool known for its versatility in network mapping. nmap’s Network Scripting Engine (NSE) scripts are particularly useful for probing specific vulnerabilities or unique characteristics of computer systems. For our investigation into Kerberos, we’ll focus on systems using SMB, typically found on port 445. To identify any vulnerabilities or misconfiguration(s) associated with this port, we will expertly employ the following command.
Command(s)
sudo nmap --script smb-protocols -p 445 10.10.10.0/24
Output
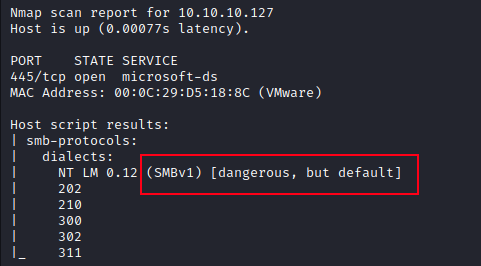
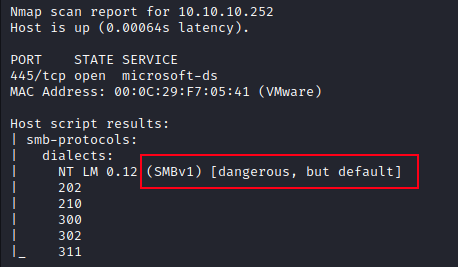
Results
Examining the output from the command we can see that there are 2 systems that could be potentially valuable to us due to the SMB protocol dialects that are enabled, those systems (10.10.10.127 / 10.10.10.252) both allow for NTLM (SMBv1) to be used.
CrackmapExec
Diving deeper into our reconnaissance and information gathering arsenal, we find CrackmapExec, a powerful and versatile tool. Far more than a mere data collector, CrackmapExec serves as a multifunctional utility capable of credential spraying and much more, supporting a wide range of protocols beyond just SMB. In our focused efforts on the SMB protocol, we’ll leverage CrackmapExec to gather critical information and compile a relay list for strategic operations. Next, we’ll explore the specific commands needed to effectively navigate this phase of our cyber exploration.
Command(s)
crackmapexec smb 10.10.10.0/24
crackmapexec smb 10.10.10.0/24 --gen-relay-list target.txt
Output

Results
Examining the output from CrackMapExec, it’s clear that the tool has successfully harvested a wealth of information. We’ve uncovered key details ranging from system names and build data to specific configurations. Notably, the output provides insights into the status of SMB signing and the usage of SMBv1, as well as assisting in the generation of a relay list. Additionally, we’ve obtained the Fully Qualified Domain Names (FQDN) for all devices with active SMB services. This information is derived from the format “name.domain” as displayed in the CrackMapExec output, including:
- CLIENT.adlab.org
- FS1.adlab.org
- DC1.adlab.org
CrackmapExec (NULL User Check)
In our standard assessment protocol, a crucial step involves conducting a NULL user check using CrackmapExec. This maneuver serves as an effective litmus test to identify devices within the network that allow anonymous logins, providing a significant advantage by enabling expedited access. This method eliminates the need for reliance on proxychains or other indirect access methods, streamlining our approach to system exploration. To execute this check and capitalize on these vulnerabilities, we utilize the following command.
Command(s)
crackmapexec smb -u '' -N 10.10.10.0/24
Output

The green plus sign in the image above indicates a ‘successful’ login to an SMB share using the NULL user logon. It’s important to note that the IP address associated with this event is 10.10.10.252, corresponding to DC1. However, since screenshots do not show this detail, it is crucial to manually verify this information to rule out any false positives. This step ensures that our findings are accurate and that we proceed with the correct information in our security assessment. To verify that this information is accurate we can use the following command.
Command(s)
smbclient -L \\10.10.10.252 -U '' -N
Output

Analyzing the output provided, it seems that DC1 might be a potential vulnerability, indicating the possibility of allowing anonymous user logins. However, when we attempt manual access to the device, we encounter denial, highlighting a key principle that is vital not only in cybersecurity but in many areas of life: “trust but verify.” This principle reinforces the importance of verification to ensure that our findings are accurate and that we respond appropriately to potential security threats.
Finding Domain Controllers
In our overarching mission to gain control over the network’s domain controllers, a pivotal first step involves unraveling the intricacies of the Active Directory Environment. Central to this quest is the need to discern the domain name that governs the entire ecosystem. To streamline this process, we turn to the trusty NMap tool, leveraging its capabilities to request vital information while conducting our comprehensive scans.
Command(s)
nmap -Pn -p 53,88,389,636 -sV 10.10.10.100,127,252
Output

Results
The outcome of the NMap scan, a significant discovery emerges: a lone system boldly running both LDAP and Kerberos. This compelling revelation serves as a strong indicator, suggesting that we may have laid eyes on a potential domain controller within the network.
Alternative from using NMap
Domain controllers occasionally cloak themselves by eschewing the conventional ports and services, adding an extra layer of complexity to our pursuit. Embracing the philosophy of “trust but verify,” we turn to the stalwart guardians of network identity — the DNS records. These records, akin to a trail of digital breadcrumbs, offer invaluable insights, helping us validate the precision of our information. By deciphering the nuances of DNS
Command(s)
nslookup -type=srv _ldap._tcp.dc._msdcs.adlab.org
Output

Results
Having laid the groundwork for our Active Directory reconnaissance, we’ve equipped ourselves with the essential information to propel our mission forward. In the upcoming post, we’ll seamlessly transition to the next phase, wielding specialized tools to extract hashes and tickets, on our quest to gain the coveted initial foothold.
Wrapping Up
In our latest post, we delved into the critical phase of internal network reconnaissance, meticulously identifying vulnerable and pivotal systems within the ecosystem. This wealth of information serves as a compass, guiding us toward the next crucial step in our offensive against Active Directory. By honing in on potential vulnerabilities and pinpointing key systems, we’ve laid the groundwork for a strategic assault on Active Directory. This trove of details becomes the linchpin for orchestrating targeted attacks, providing us with the insights needed to craft precise and effective strategies.
Knowledge Table
| Our Kali system | 10.10.10.200 |
| Computers in the network | 10.10.10.100 – CLIENT.adlab.org 10.10.10.127 – FS1.adlab.org 10.10.10.252 – DC1.adlab.org |
| Active Directory Domain Name | adlab.org |
| Domain Controller(s) | 10.10.10.252 |
| Vulnerable Systems | 10.10.10.10010.10.10.127 |